This page contains detailed instructions for installing the Nature’s Head. Please read everything carefully, and watch the videos prior to installing.
This video shows an RV installation
Here is an installation in a tiny home
What’s in the Box?
- Your new Nature’s Head™ composting toilet
- Basic installation kit:
- 5 feet of 1½ inch inside diameter hose with ends inside vent flange
- agitator handle
- 2 mounting brackets and knobs
- 4 mounting bolts (for wood floor installations)
- 6 feet wiring for internal fan hook-up required for 12 volt system
- fuse holder and fuse for direct battery attachment
- Allen wrench for installation of spider handle
- liquids tank cap
- Instruction manual
Note: The exhaust fan for the head has been installed before shipment.
Items You May Need to Complete Your Nature’s Head Installation
Your NATURE’S HEAD® composting toilet comes with most of the items necessary for completion of your installation. The outside vent is not included because each application is different and many will require a different vent. Please see the venting section of our instructions for additional tips and suggestions. Feel free to contact us by email or phone with any questions you have concerning your installation.
Some installations may require increased hose lengths which may be purchased on a per foot basis. PVC pipe, which may be obtained at most home improvement or hardware stores, may also be substituted for longer hose sections.
For floor construction other than wood, a different type of mounting bolt may be required. If the installation is in a basement or on another concrete floor, many customers have found it convenient to mount the toilet to a section of plywood rather than trying to drill masonry. The plywood can be placed on the concrete floor and painted or varnished for appearance.
If regular household current is available (110 volts), the head can be powered by a 12 volt transformer or wall adapter. These may be purchased from Nature’s Head, Inc.
Some type of composting material will be required. The most commonly used material is sphagnum peat moss (organic) which is available at most garden stores or home improvement stores such as Lowe’s or Home Depot. It is usually available in a shrink-wrapped 3 ft cubic bale for $8 to $10. This quantity of sphagnum peat moss should sustain use of the head for a year or longer. The sphagnum peat moss should be organic, no additives. DO NOT use MIRACLE-GRO peat moss, as it is enriched with plant food.
Coconut fiber (also referred to as coir brick) is also an acceptable composting medium. However, it is more costly and less readily available. It may be obtained at hydroponic gardening outlets.
Nature’s Head Composting Toilet Dimensions
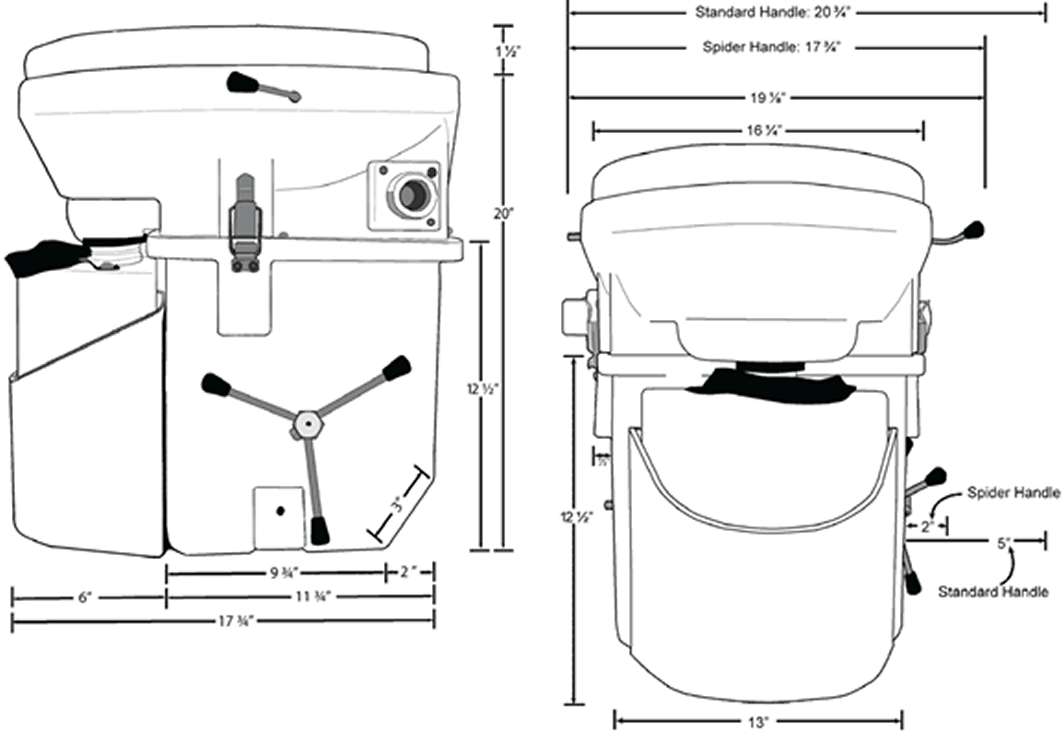
Nature’s Head measurements
Location
Clearance is required for servicing your Nature’s Head. When locating your new NATURE’S HEAD®, be certain to allow enough room for the toilet to function and be serviced. Be sure that the lid will open fully. You must also be certain that the bowl has enough room to tilt rearward to allow for its removal and for the removal of the liquid tank. If mounted against a wall or bulkhead, allow a minimum of 2 inches between the back of the toilet and the wall.
It is necessary to allow adequate room for the hose connection and agitator handle. Both of these may be re-located to the opposite side of the unit if needed. In some space-restricted areas it may be necessary to offset the toilet to one side or even turn the toilet slightly to one side to allow for extra clearance.
clearance for Nature’s Head
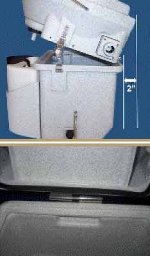
With the standard handle attached, the width of the unit is 20 ¾ inches. For more confined spaces, the optional spider handle decreases the width to 17 ¾ inches. Two inches to the left side of the head (as you face it) is required to slide the bowl off the slip hinge for servicing the base. Figure 2. In severely confined spaces, removing the mounting knobs and sliding the toilet away from the mounting location may be a more desirable method of servicing the unit.
Mounting
After choosing the location for your toilet, it is necessary to secure it to the floor of your boat, cabin, or RV using the two L-brackets. The brackets may be positioned to the inside or outside of the base of the unit as you desire. (The normal mounting is to position the L-brackets under the base in the recesses in the toilet.)
Counter sunk mounting screws are included for installing to a wood floor.
To mount the L-brackets to the floor, position the base of the toilet in the previously selected location. Attach the L-brackets to the toilet with the knobs provided. If you choose to mount the L-brackets facing out (not under the toilet) simply mark the holes in the brackets with a pencil for drill locations. If you choose to mount them under the toilet, carefully trace around as much of the outline of the bracket as possible. Make note of the distance between the bracket and the lines you drew. Now remove the brackets from the toilet and move the toilet out of the way. Carefully position the L-brackets inside of the lines that you drew and mark the holes for drilling. Before drilling any holes in your floor or walls, be sure you know what is behind them! The holes in the brackets are for #12 countersunk bolts or screws. If you are using the screws provided you will need to drill a 1/8 inch pilot hole in the drill marks you made on the floor.
If you are uncertain if your brackets are positioned correctly, drill and mount just one bracket. Then reposition the toilet and mount to the one attached bracket. Check the positioning of your other bracket and marks. If all looks good, proceed with drilling and mounting the other bracket. If your markings are off, adjust your lines and proceed with mounting the second bracket. If mounting the toilet to a floor that will get wet frequently, a small amount of caulk should be placed in the holes before installing your screws. Attach your toilet and check to be sure everything works and fits as you intended.
Do not over tighten the hold down knobs as you will damage the threads in the base!
Venting
The unit must be vented to the outside of your cabin whether it is a boat, RV, truck, or vacation property. This helps keep your bathroom smelling fresh, and allows for proper growth of beneficial bacteria which facilitates the composting process.
Installing the venting system will be the most difficult portion of the installation. The average do-it-yourselfer

hose connection Nature’s Head
should be able to easily accomplish this if one is familiar with and has the proper tools. Depending on the type and placement of your vent, you may be required to cut holes in the wall, ceiling, or the floor. If you are unsure if you are qualified to complete this portion, it may be wise to hire a contractor or handyman to do this for you.
Due to the variety of ventilation choices available, the external vent has not been provided. Mushroom vents, solar vents, and clamshell-type vents are commonly used for venting to the exterior. The unit may be vented horizontally or vertically through the roof, wall, or the floor. Rubber hose adapters which connect directly to your toilet and the outside vent flange are provided. For installations in homes, cabins, and other permanent structures the venting can be placed horizontally through the wall with 1¼ inch PVC pipe. The outside vent can be as simple as a PVC pipe with a 90 degree elbow pointing down to prevent wind and water entering into the toilet. Attaching screen (not provided) over the opening is recommended. This will prevent the entry of insects into the system. Any mesh fabric such as window screen or nylon netting will provide an adequate insect barrier. A mushroom vent may be used in place of the PVC elbow and has a built in screen.
If a sharp 90 degree turn from the fan housing is needed, a 1¼ inch PVC street elbow (not provided) may be used to achieve a proper configuration. Installations on boats and RV’s are easily managed with the stainless steel mushroom vent with the built in screen and adjustable top which is self-sealing. The hose adapter provided with the toilet would be placed inside under the vent. On many boats, the pump-out fitting can be removed and the mushroom vent mounted over the existing hole. The venting hose provided with the unit will attach directly to the adapter.
Clamping is not necessary on the connection for the head, and normally not necessary on the exterior connecter. With an overhead connection, you may find it necessary to clamp this end depending on the amount of support provided for the vent hose. If the hose is supported properly, you will probably not need a clamp. The vent hose must be attached to the housing which has the fan inside it. The unit is designed to pull fresh air through the head and ventilate it outside. If you disassemble the fan housing, always check to be certain that the fan is blowing out of the vent before re-attaching the vent hose.
Power Connection
A simple 12 volt computer muffin fan drawing less than 2 amp hours (12 volt power) in 24 hours is the only power required for this unit. The power plug, a single pin attachment with a wire length of 6 feet, is also included. The “single pin” power supply will plug into the receptacle on the FAN housing. Figure 5. It may be necessary to extend the length of the connecting wire.
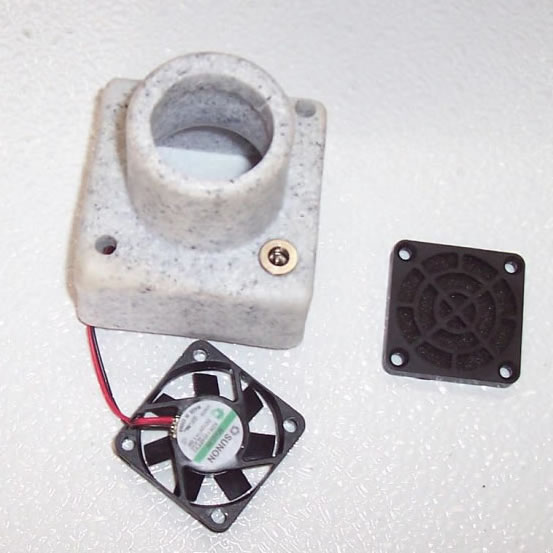
Nature’s Head fan housing
As with all electrical connections, be sure your head is on a fused circuit. The fuse should be no less than 2 amps and no more than 5 amps (12 volts). A fuse holder and fuse are provided for use in a non-protected 12 volt system such as direct attachment to a battery.
The fan may also be powered by a 110 volt source with an appropriate power adapter that reduces the power to 12 volts. If the system is being powered by the 110 volt power adapter disregard the fuse, fuse holder and single pin cable as they are intended for use ONLY with a 12 volt power source. No fuse is required when using the wall transformer. These power adapters are available through Nature’s Head, Inc.
If you are unsure about your wiring system or requirements, please consult an electrician.
This unit may be converted to a powerless installation by using a solar vent on the roof or cabin top and attaching the vent hose underneath. Depending on the fan chosen and the type of roof in your application, some form of adapter may be necessary. Be sure and use the solar vent with battery back-up so your head will vent continuously. The internal fan in the toilet can be left in the unit if you choose this option.
Hi, I am thinking of installing the Nature’s Head composting toilet in my RV, and have a question about the dimensions in the diagrams. It says that with the spider handle, the width is 17 3/4 inches. But in the diagram, it shows 19 1/4 inches to include the side handle for using the solids compartment. It also says that an additional 2 inches are required on the left, to slide the slip hinge over. So my question is: What total width do I really need?
Thanks for the question. You need different widths at different heights, exactly as shown on the diagram. We don’t just give one measurement, because boats are not square, and they get wider as you go up. You might have more room at one spot and less at another. We can’t give you a number and say you need X space because boats are different. If space is tight I would print the measurements and go down to the boat with a tape measure.
At the height of the spider handle, the toilet is 17.75″. At the height of the lever that opens the trap door, it is 19.25″.
Beyond that, 2″ of horizontal movement back and forth for the hinge is nice to have. But you can take off that hinge and just lift the top of the toilet straight up if you don’t have it. If you did that, you’d need 19.25″ at the lever height and 17.75″ at the handle height. Plus a bit of room for your hands, and cleaning it. I’d say don’t attempt it if you don’t have a good 20″ side to side, but some have made it with less.
Don’t forget to allow space for your legs when you sit on the toilet.
Hi – We have a small cottage in northern ontario. We use it only rarely in the winter months, so we shut off the power and allow the cottage to freeze up. Can we still use a nature’s head unit in this situation? Or would we have to leave some heat/power on all winter? Would assume we can empty the fluid tank, but what about the solids?
Also wondering about the cleanliness of the solids on the solid lid; thinking that some solids will stick to the lid (and perhaps sides of the bowl) – how do you clean the bowl and solid lid after use? Are SOME fluids allowed to go into the ‘solids tank’??
Thanks a lot, Rob
Freezing is no problem at all. The toilet is built like a tank, and is practically indestructible. No power needed. However, I suggest emptying it before leaving in the fall anyway. When things start to thaw, you’ll need the fan running if there are solids in there. When you return, there could be an odour. Just empty it, and turn the power off.
You spray the bowl with water from a bottle that is included with the toilet. Then wipe with a paper towel, and drop the towel in to the solids tank. A small amount of liquid is no problem at all.